Gloomhaven Enhancement guide
Minor spoilers ahead!!
While the existence of Gloomhaven enhancements is not a spoiler, how and when you get access to them is.
The goal of the this guide is to provide some guidance and options on selecting your enhancements. If you haven't got access to enhancements yet, I recommend you go back to your game until you eventually unlock it.
 |
| Enhancements are also very expensive! |
Enhancements allow for personal choice and allow for plenty of room to experiment with different playstyles. This guide is to give some general advice on choosing your enhancements and what cards to improve.
 |
| It's sticker time! |
How much does it cost?
Figuring out how much an enhancement costs can seem like a silly math puzzle, but it doesn't need to be. My suggestion is to use a calculator. Any one of these will do.
- The Arcane Library - Enhancement calculator
- Excel Enhancement calculator on Boardgamegeek by Dathras.
- Gloomhaven Companion App by TomKat Creative
But for those who don't have a calculator handy, the price list is below:

At a glance:
- Enhancing higher level cards costs more. If we were trying to be cost effective, we would aim enhance good, powerful level 1 cards first.
- Previous enhancements really up the pricing.
- Disarm is the most expensive enhancement, for good reason. Jump, Strengthen, Bless and Muddle are the cheapest effects. +1 to Heal, Push, Pull, Pierce, Range and Move are the cheapest +1 effects.

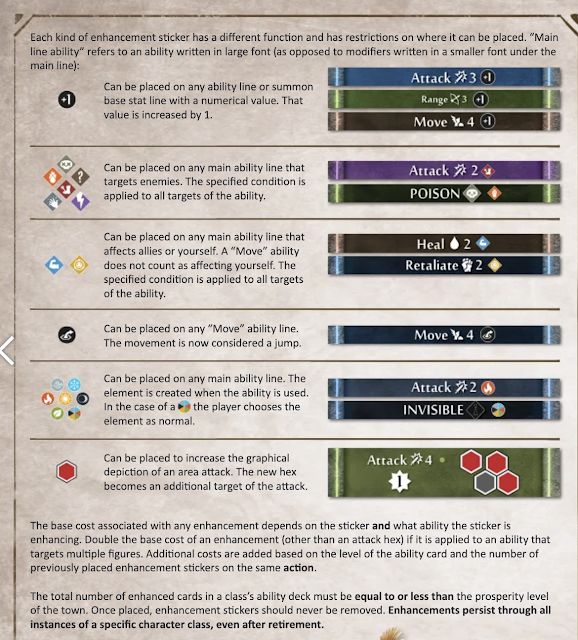
Enhancement Limits
The total number of enhanced cards in a class’s ability deck must be equal to or less than the prosperity level of the town. Once placed, enhancement stickers should never be removed. Enhancements persist through all instances of a specific character class, even after retirement.
There's also limits to where you can place each respective enhancement effect. For example you can't add poison to a move effect or a jump to an attack effect.
General Enhancement Guidelines
- Adding a jump to a strong move card is always useful. For scenarios where the objective is to loot or reach a certain point, you will be thankful to have an extra jump handy.
- Elements can be added on any main ability line. This is best used for Move effects. For Characters like the Cragheart, adding extra Earth Elements to your Move cards will go a long way for you.
- If your character struggles against enemies with high shield values, try adding Wound effects to your cards. Even if you don't break through the shield, the wounds will still damage them.
- Adding immobilize to push effects is amazing. By immobilizing and then pushing a melee monster away, you make sure they can't hit you back on their turn!
- Curse gets better the more you stack it. It's expensive, but if you can add curse to your multi target attacks you'll find it does alot for helping your party survive monster attacks.
- Disarm is expensive, but if you can afford it, put it on your low initiative attack cards. When you do go for a disarm, you generally want to act before your enemies do.
- Bless is more powerful on characters who make strong attacks consistently. Otherwise you're generally better with Strengthen. For example a Scoundrel who regularly pulls Attack 3-5 regularly will benefit more from Bless than a Cragheart using Dirt Tornado doing an Attack 1 to soften enemy groups.
- In general, you get more out of your enhancements by placing them on non-loss cards. Some powerful loss cards may still benefit tremendously from certain enhancements.
- Enhancing any multi target attack doubles the base cost. This means whether it's sticking a curse effect on Dirt Tornado or Reviving Shock, it will cost the same. Big area attacks like Dirt Tornado are prime targets for piling on status effects.
- UPDATE: Adding strengthen to the bottom action such as the heal on mana bolt helps set you up with advantage for when need it.
 |
| Curse costs 75g. Both are level 1 cards that hit multiple targets. The cost to enhancing both these cards is 150g each (75g multiplied by 2). |
Character specific enhancement guide
- Mystic Ally (summon) +1 Range. (50g)
- Mystic ally is already such a powerful summon. More range makes it more flexible to use/
- Mana Bolt (Top) +1 Atk (50g)
- Mana Bolt (Bottom) Strengthen (50g)
- Flame Strike (Top or Bottom) +1 Range (30g)
- Flame Strike's 2 range can be tricky to use. Adding range to the top makes it better than Mana Bolt.
- Impaling Eruption (Bottom) Jump (50g)
- If you need an extra jump card
- Impaling Eruption (Top) +1 Range (60g)
- Flashing Burst (Top) +1 Atk or Wound (75g / 100g)
- Coldfire (Top) Add hex (116g)
- Elemental Aid (Top) Bless (100g)
- Grab & Go (Bottom) / Fatal Advance add Jump (50g)
- Trample (Bottom) +1 Move (30g).
- It's a loss card but the combination is extremely powerful and relatively cheap on gold it's worth a mention.
- Leaping Cleave (Bottom) +1 Move (30g)
- The 3 Move jump is already good. Make it 4 to help close the distance. Helps when combining with Balanced Measure.
- Spare Dagger (Bottom) Add Poison (75g)
- This helps when you combo your bottom dagger poison with another top attack.
- Brute Force (Top) Add Curse or Wound (200g)
- Curse is good if your party is also adding curses. Otherwise spreading those wounds is always nice.
- Flanking Strike (Top) +1 Attack (50g)
- Flanking Strike (Bottom) Jump (50g)
- Flanking strike is your best level 1 card, so investing in it will go a long way for your campaign.
- Backstab (Bottom) Jump (50g)
- Thief's Knack (Bottom) Poison (75g).
- Poison on bottom combines with a top attack for big damage.
- Swift Bow (Top) Add Immobilize (100g)
- Good for shooting melee monsters to prevent them from approaching.
- Open Wound (Top) +1 Attack (75g)
- Smoke Bomb (Top) Strengthen (50g)
- Strengthen to gain advantage on following turn to make sure you hit your target.
- Rumbling Advance (Bottom) +1 Move (30g)
- Extra movement helps position yourself and avoid friendly fire
- Massive Boulder (Top) +1 Attack (50g)
- Massive Boulder (Bottom) Jump (50g)
- Heaving Swing (Top) Immobilize (100g)
- Stops melee enemies from hitting you back
- Dirt Tornado (Top) Curse (150g)
- When dropping into hot, deadly rooms, this lets you fill the monster deck with curses. If you can save up 150g this is one of the single most powerful enhancements you can make in the game.
- Adding Earth element to any level 1 card Move or Attack action (100g).
- Proximity Mine, Ink Bomb, Stun Shot (Bottom) Add Jump (50g)
- Stun Shot is the preferred card to enhance as both halves are non-loss effects, but each of these are solid movement cards.
- Reinvigorating Elixir, Restorative Mist, Stamina Booster (Top) Add Bless or Strengthen (50g / 75g for Stamina Booster)
- Restorative Mist (Bottom) +1 Move (30g)
- Enhancement Field (Top) +1 Attack (50g)
- This one's just a solid ranged attack
- Disorienting Flash (Bottom) +1 Move (55g)
- Fearsome Blade (Top) Immobilize (100g)
- Powerful early game enhancement for the Mindthief if you can afford it.
- Empathetic Assault (Bottom) Strengthen (50g)
- Great to give yourself advantage and position yourself for an offensive.
- Feedback Loop (Bottom) +1 Move (30g)
- Already decent jump card, more movement makes it much better.
- Peverse Edge (Bottom) +1 Range (30g)
- Going from 2 to 3 Range Stun makes it much easier to use.
- The Mindthief benefits from consuming Ice elements but could use more help to generate Ice Element reliably. You can add Ice Element to any level 1 move or attack for 100g.
- Patch fur (Bottom) Bless (50g)
- Two mini class benefits from bless quite a bit since the bear hits quite hard with concentrated rage.
- Howling Bolts (Bottom) Jump (50g)
- Nothing quite like a huge jumping bear.
- Vicious Ally (Bottom) / Unstoppable Beast (Top) +1 Attack. (150g).
- Energizing Strike (Top) +1 Attack / Wound (75g / 100g)
- Strength in Agony (Bottom) Jump (50g)
- Bounce Back (Bottom) Strengthen (50g)
- Adding a Strengthen to the bottom helps you attack with advantage when you need it.
- Unbridled Power (Top) Wound (75g)
- Adding wound to a stun effect is great. Means they take at least 2 wound damage before they can act again after the stun wears off.
- Numb the Pain (Bottom) +1 Move (30g)
- Break the Chains (Bottom) +1 Move or Jump (55g / 75g)
- Fatal Fury (Bottom) +1 Move (80g)
- This makes the positioning easier.
- Hastened Step (Bottom) Jump (50g)
- Crushing Hammer (Bottom) Bless (50g)
- Crippling Blow (Bottom) Poison / Wound (75g)
- Already a useful bottom with a ranged immobilize.
- The Quartermaster doesn't have alot of good early game enhancements, but the class benefits more from spending gold on items anyway.
- Solid Bow (Top) +1 Attack (50g)
- A Moment's Peace (Bottom) Strengthen / Bless (50g)
- Swift Trickery (Bottom) Jump (50g)
- Fresh Kill (Top) +1 Range (30g)
- Press the Attack (Top) +1 Range (30g)
- The Doomstalker is a fairly straightforward character. It does ranged damage and does it consistently. Enhancing more range and more attack
- Creeping Curse / Gathering Doom (Top) Curse (75g)
- Curse is better when it stacks.
- Spread the Plague (Bottom) Poison (75g)
- Wretched Swarm (Bottom) Jump (50g)
- Under The Skin (Bottom) Jump (75g)
- Paralyzing Bite (Top) Poison / Wound (75g)
- Unlike the Cragheart, none of the level 1 big area attacks can be enhanced with Curse. However, you still have plenty of Curses to give, and enhancing those will go a long way to helping your team survive Monster attacks.
- Tactical Order (Top / Bottom) Jump (50g)
- Daybreak (Bottom) +1 Move / Bless (30g / 50g)
- Purifying Aura (Bottom) Bless (50g)
- Defensive Stance (Bottom) +1 Shield (100g)
- Permanent 2 Shield buff is extremely powerful.
- Hammer blow (Top) +1 Attack (50g)
- Sun Class has many cards to use Light Elements. Adding a Light element to your cards will benefit you overall.
- Smokestep (Bottom) +1 Move (30g)
- Good card, but Move 1 is hard to use. Give it a +1 Move and this becomes a much better card.
- Doomed Breeze (Top) Add Poison or Wound (75g)
- Prepare for the Kill (Bottom) +1 Move (55g)
- Eclipse class doesn't have many strong early campaign options for enhancement. Eclipse uses lots of Dark element. If in doubt, you can simply add a dark element to any move or attack action for (100g).
- Wild Animation (Top) +1 Move (100g)
- Helps the summon keep up with the party.
- Wild Animation (Bottom) Jump (50g)
- Living Night (Top) +1 Attack (100g)
- Since you get two summons out of this one, upgrading this has double the effect.
- Volatile Flame (Top) +1 Move (100g)
- The extra move helps this one close the distance and get into exploding range.
- Most of the Summon enhancements are expensive but are worth it.
- Tuning the Outcome (Bottom) Curse (75g)
- Nimble Knife (Top) Add curse (75g)
- Singing Arrow (Top) Add Hex (66g)
- Curse is better, the more there is.
- Nimble Knife (Bottom) Jump (50g)
- Throw Voice (Top) Add Hex (66g)
- Marching Beat (Top / Bottom) Add Jump (50g)
- This class benefits the most from adding "Any Element" enhancement to their actions (150g). The elemental versatility makes it much easier to set up your turns and this class becomes significantly more powerful when able to consistently utilize elements.
- Examples of good places to add "Any Element"
- Pure Augmentation (Bottom)
- Raw Enhancement (Bottom)
- Encompassing Shadow (Bottom)
- Triage (Bottom) Add Jump (50g)
- First Aid (Bottom) Add Jump (50g)
- Precaution (Top) Bless (125g)
- Better in 4 person party.
- Bloody Saw (Top) +1 Attack (50g)
- Hamstring (Bottom) Add Jump (75g)
Lots of good information and thoughts here. As a tinkerer nearing retirement - I'd also recommend adding Wound to the top of Stun Shot. This helps fix one of our core weaknesses in dealing with Shielded enemies as it's at least an auto 2 damage that gets through.
ReplyDeleteThis means that if you also enhance the bottom of Stun Shot - you've got a card that will carry you nicely through to level 9.
Good point! and it's only 75g!
DeleteFor Triforce:
ReplyDeleteI think Jump is better on the Pure/Raw, a 3-7 (+boots) move with jump puts you exactly where you want. Triforce has several reasons to have exact positioning, but my favorite setup is for Lava [something]. Which brings me to the second suggestion.
Wound on Lava [something]. With proper positioning, range increase items, and opening 1-2 doors in a turn (yes, two doors because we use upgraded Raw/Pure), it is easy to hit 12+ enemies with this spell. Power potions help with this plan, but wound ensures that all these enemies will be ticking down as they slowly move towards your party. You of course go invisible aftwerwards, then retreat back to your team on your next turn with your powerful move cards. This wound by itself can easily deal 40+ damage (serious).
You will want to upgrade the difficulty of encounters after you start using this strategy.
I prefer Wound over Curse because of shielded enemies. It has come in handy a lot.
ReplyDeleteLove this guide!
ReplyDeleteOne hint that might prove useful would be that whenever you're about to retire, you can sell all your gear first (at half price of course) and use the money to purchase an enhancement or two with that amount. That is a nice legacy for anyone (including yourself) willing to play the same class again.
That doesn't work, because the rulebook says ".. and all money the character owned is gone".
DeleteIt does indeed work because you get to do a full town visit before any remaining money goes away. That includes selling items and making enhancements. ;)
Delete