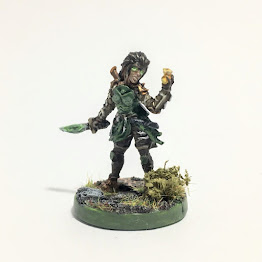
Human Scoundrel - Comprehensive guide to stabbing and looting.
 |
| Sneaky sneaky stab stab |
Let's go over what makes the scoundrel a killing machine and what limitations she has.
Strengths
- Extremely deadly, single target damage dealer.
- High movement values on her cards. Useful for closing with archer's or looting treasure.
- Access to very fast initiative values allowing her to manipulate initiative easily.
- Able to manipulate positioning with Move actions on top row, through pull effects and Sinister Opportunity (bottom).
Weaknesses
- Most susceptible to exhaustion of all starting characters due to small hand size. Spellweaver will most of the time generally outlast Scoundrel as she can recover her lost cards.
- Not many strong options for damaging multiple targets.
- Strong dependency on positioning of allies and/or enemies to maximize her damage.
- Cannot afford to play loss cards early or risk facing exhaustion.
Cards
- Flanking Strike (Initiative 04, Attack 3, +2 if ally is adjacent / Move 5 bottom. Hell yes we want this card)
- Swift Bow (Attack 3 at Range 4?, yes please)
- Single Out (Top is same as Flanking strike, bottom is a loss but gives you a recurring 2 Attack boost when attacking enemies on their own. Useful for bosses or scenarios with low enemy counts. Single out - bottom, is more powerful with low party numbers as the lower monster count makes it easier to Single out enemies).
- Venom Shiv (Attack 3 + poison / Move 5, great card for setting up poison on big targets or covering ground)
- Special Mixture (Heal 3 / Move 3 + Poison. Poison on bottom action is great because when we use the top action to attack, it hurts much harder)
- Thief's Knack (Jokingly called Thief snack. Disarming traps is useful and gives free XP but the real prize is the Attack 3 on the Bottom which can be combo'd nicely with Quick Hands)
- Quick Hands (Move 2 Attack 2 / Loot 1. Weak top attack but has move, combine with Theifs Knack on bottom to attack twice in a turn while still moving. Loot on bottom).
- Sinister Opportunity (Top is a weaker version of flanking strike that adds 1 Attack (2 if you have dark element) for each nearby friendly to your target. Bottom can force enemies into traps. Note this card is significantly better in a 4 person party than it is in a 2 person party).
- Throwing Knives (Top is a weak ranged attack with 2 targets, useful for fighting in Scenario's with narrow corridors where it's not easy or too dangerous to get into melee, Bottom is loss Loot 2 which you would rarely use).
- Backstab (Top is a loss and is similar to flanking strike with the added bonus of the Single Out effect if you can meet all the positional requirements. You're generally better off activating the bottom half of Single Out over taking backstab. Bottom Move 6 is good but we already have pretty good movement cards. Take backstab for larger scenarios where you need the extra movement).
- Smoke Bomb (Bottom is a Pull effect that can be difficult to use, but can help drag enemies through traps. Top is a loss effect and gives invisibility and doubles the value of your next attack. Useful if you want to kill a boss quickly. Note that the smoke bomb stacks with bless or the natural 2x modifier. That means if you Flanking Strike for 5, double it with Smoke bomb and also coincidentally flip a 2x modifier, you will hit for 20 damage).
- Trickster’s Reversal (Top is good for breaking shields but it's a loss card and too situational)
 |
| Flanking Strike: This is what power looks like at level 1 |
Starting items
Perks
- Ignore negative scenario effects - Negative scenario effects are on about 1/3rd of the scenarios you play on, and they are generally pretty nasty. Take this early and save yourself a lot of pain.
- Replace one -2 card with one +0 card. The -2 attack card is the closest thing to a Null attack card. It will stop you confirming kills more often than not. When you're trying to kill a monster with 4 health left with an Attack 5, there's only 2 modifier cards that will stop you: the Null attack and -2. Once you take this out, you will miss your kills far less often.
- Remove two -1 cards. These make your damage overall more reliable.
- Replace one card -1 with one +1 card. Similar to above, taking out the -1's helps make your attacks more reliable.
- Replace one +0 card with one +2 card. Solid perk.
- Remove four +0 cards. This perk doesn't make your deck more powerful until after you get a few other perks first. By removing the +0's after you've removed most of the -1's, you will flip green cards more consistently.
- Add two rolling +1 cards. These overall add extra damage while helping cycle through your deck. Note that rolling modifiers can make your modifier deck flip nulls if you have advantage. On the flip side, rolling modifiers also make disadvantage less bad, as it makes it possible to flip a 2x even when at disadvantage (rolling modifier gets ignored in disadvantage).
- Add one rolling INVISIBLE card. This one is actually pretty good. You're never really sad to flip an invisible card out of nowhere. If you do flip one of these in Melee, you can take some risks with your positioning.
- Add two rolling POISON cards. Inconsistently poisoning enemies isn't that great. The effect is wasted if you kill your target. It is better than the rolling pierce though.
- Add two rolling MUDDLE cards. Similar to poison. Inconsistent muddle is hard to utilize and it's only useful if your target survives (which you generally don't want them to).
- Add two rolling PIERCE 3 cards. This perk does nothing for enemies without shields. When you do attack shielded enemies, it is difficult to get this effect when you need it. Generally there are better perks to pick.
 |
| Stop exhausting, the bad guys are still around... |
Party
The Scoundrel is unique in that a number of her attacks depend on her allies being positioned near her targets. As a result, party composition will dictate how you play Scoundrel and how your allies play.
Brute / Mindthief: Great teammates for the Scoundrel. Both primarily melee attackers and naturally position themselves for your Flanking Strikes. Their play style naturally complements yours.
Cragheart: Also a great teammate, but be wary as Cragheart has friendly fire on some of his moves. Some caution is required when standing too close to the Cragheart or his targets. Coordinate with your rocky friend to make sure you're not going to be in the way. The Scoundrel has a moderate health pool and can take some hits, but you don't have spare cards to lose.
Spellweaver / Tinkerer: Neither of these classes typically engage in Melee with enemies which can make landing Flanking Strikes more difficult. Some adjustment to your party strategy may be needed. The Tinkerer's decoy summon can help trigger your Flanking Strikes, and the Spellweaver can load up Frost Armor to block hits and play more aggressively. I would also suggest the Spellweaver buy a cloak of invisibility as described in the Spellweaver introduction as an invisible Spellweaver can still meet Flanking Strike / Single Out conditions.
 |
| Friendly fire isn't really that friendly |
Playstyle
Swift Bow / Single Out
Single Out's bottom action is powerful persistent loss effect, but requires you to forgo a round of movement. One way to activate this without losing your momentum is to combine it with Swift bow. That way you're still killing enemies, even if you aren't pushing forward through the scenario.


In case you've missed it, Single Out's bottom persistent effect does NOT specify Melee attacks. It works with Swift Bow and Throwing Knives, which means you can be shooting enemies for Attack 5!
Smoke Bomb
If we're fighting a boss we can also combine Single Out with Smoke Bomb to prepare for a huge attack next round. Normally burning so many loss cards together for a character with a small card pool is a bad idea, but if you're boss hunting, it can be valuable to go for a fast kill.
Smoke Bomb fun fact: The invisibility will last until the end of your next turn. However, Smoke bomb's double damage effect technically lasts until you use it or the end of the Scenario (Note the infinity symbol). Say you activate Smoke Bomb, but the boss moves or teleport's somewhere else so you lose your opportunity to attack it. 😢... The only requirement to activate the damage double effect is that you are invisible, so if you have a Cloak of Invisibility you can make yourself invisible later and trigger the double damage.
Smoke Bomb fun fact 2: The Smoke bomb double damage effect stacks with the 2x attack modifier. Pg 20 from the Rulebook
When attacking, the base attack value written on the card can be modified by three types of values in the following order. Repeat these steps for each individual enemy targeted by the attack:
An attacker’s attack modifiers are applied first. These modifiers include bonuses and penalties from active ability cards, items, and other sources (e.g., +1 Attack from POISON).
Next, an attack modifier card is drawn from the attacker’s attack modifier deck and applied.
Lastly, the defender’s defensive bonuses are applied. This reduces the incoming attack value for each individual enemy targeted based on each defender’s own shield modifier or other defensive bonuses.
If there are multiple modifiers in any single step of this process, the player chooses the order in which they are applied. Also note that because the bonuses are applied per target, it is possible for the same attack action to ultimately deal different damage to each enemy it targets.
That means if you Flanking Strike (3 Attack) on a monster (while an ally is adjacent +2 Attack) with Singled Out (while the enemy is alone +2 Attack) while they are poisoned (+1 Attack) with Smoke Bomb active (2x) and if you happen to flip a 2x attack modifier, it is theoretically possible to do 32 damage. You can theoretically go up to 40 with Backstab. It sounds glorious but that's alot of loss cards. Make sure the target is worth the cards you're throwing at it!
Sinister Opportunity
 |
| That archer is in trouble |
Leveling up
Minor spoilers regarding Scoundrel's cards from this point. Stop reading now if you don't wish to spoil your level up cards.
Scoundrel Level 2-9 SPOILERS AHEAD
Last chance...
.
.
.
.
Too late... Lets go
Level 2
Level 3


Level 4


Level 5


Level 6


Level 7
When a character reaches a new level, add one new card to their active card pool. The card selected must be from the character’s class and have a card level equal to or less than the character’s new level.


Level 8


Level 9


Item Advancement
Stop now if you don't want item spoilers. Items up to Prosperity 1-4 will be discussed. I won't go into any random item designs though.
PROSPERITY 4 ITEM SPOILERS AHEAD
Not a spoiler yet
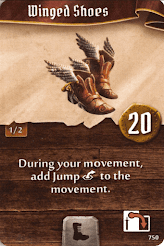
Winged shoes (Item #2) can help you navigate stages with high obstacle counts. The Scoundrel already has impressive Move values, so being able to add Jump is extra sweet.
 |
| Shoes with wings, a fashion statement for every Scoundrel |
Another early item that you can work toward is Eagle-Eye Goggles (Item #6) from prosperity 1. This helps you gain advantage when you need it. For example during Boss Fights where you want to make sure you land your double damage Smoke Bomb combo.
 |
Minor Power Potion Item (#14) can help power up those weak multi target range attacks. Get this only if you find yourself using attacks like Throwing Knives often.
Remember there is a limit to the number of small items you can carry, and that is equal to half your level rounded up. Easy way to remember is every odd level you can carry an extra small item. Level 3 = 2 small items, Level 5 = 3 small items, Level 7 = 4 small items, Level 9 = 5 small items.
 |
| Taste like chicken |
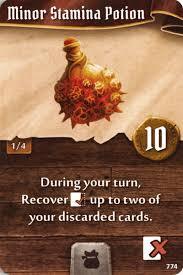
Prosperity 2 opens up this interesting gem. #Item 17, Empowering Talisman. It's headgear so it does take the same slot as Eagle Eye Goggles. Get this if you didn't manage to pick up the Goggles as it essentially lets you reuse your Stamina potion again. You can pull off 3 Flanking Strikes in a row by combining this with a Stamina potion.
 |
| It's really another Stamina potion in disguise |
Eventually you will want to work towards the #Item 26, Long spear from prosperity 3. If you have a poisoned dagger, this will replace it.
 |
| More stabbing |
The spear helps make your deadly single target attacks more deadly by hitting more enemies!
 |
| The secret is really popeye's spinach |
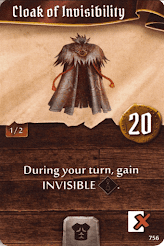
I'd suggest keeping the Cloak of Invisibility as invisibility is always useful for keeping you safe in dangerous positions. There's an argument to take Cloak of Pockets (#Item 16) to carry more potions if you feel the invisibility is not as useful.
Does this guide help you avoid exhaustion? Feedback is always appreciated. May your road events be peaceful.


Hey Jacko! Is it ok if we’re on a first name basis?
ReplyDeleteAs a relatively new GH player, I’m loving your character guides.
I’d like to see an article about long v short rests from a tactical standpoint. I find my self almost never long resting.
Thanks!
Bert
Cool I will try to come up with something! It's generally difficult to long rest while enemies are right infront of you!
Delete