Gloomhaven Tactics - Crowd Control
The key to winning scenarios on higher difficulties in Gloomhaven is effective crowd control. Crowd Control is loosely defined as limiting the number of enemies that are actively attacking you. In Gloomhaven you are always outnumbered and some of your enemies are straight up tougher and deadlier than you. Good crowd control is how you even the odds.
With some well placed stuns, immobilizes and some good positioning you can restrict how many enemies can attack you. This will help you take less damage, and ultimately push you closer to winning your scenario.

Well since your party is filled with flexible melee / ranged fighters, you can surround the door and limit how many the Living Bones can fight you.
The theory is simple, you have 3 characters, fighting 1 skeleton at the same time. If my math's is any good, 3 is better than 1 and so you have a pretty distinct advantage here.
The premise is simple, you opened the door and you don't like what you see. A room with ranged enemies that will turn you into a hedgehog. Take a few steps back and get behind the wall.
 |
| Hey Tinkerer... Got any more of them Net Shooters? |
With some well placed stuns, immobilizes and some good positioning you can restrict how many enemies can attack you. This will help you take less damage, and ultimately push you closer to winning your scenario.
A note about tanking & healing.
Healing and "Tanking" in Gloomhaven does not scale. Unlike attacks, which use your attack modifier deck, that gets better as you level up, healing values stay put. This isn't World of Warcraft or another traditional RPG where specific dedicated tank & healer roles are mandatory though. In Gloomhaven, healing is useful, but not useful as a full time role.
The traditional role of "Tanking": having one character be the focus of enemies and take most of the hits is also not an effective strategy in Gloomhaven. This is because monsters always outnumber you and they hit hard! You'll find it more effective when you can spread out damage between party members (yes even your squishy friends like the Spellweaver should take an occasional hit). When you let your Brute take all the hits, what you'll find is they will start losing cards and exhaust quickly. Later in the campaign this becomes more apparent as monsters become more dangerous.
In Gloomhaven preventing damage is always better. Good positioning, and initiative management will keep you alive more than any healing potion.
Types of Crowd Control
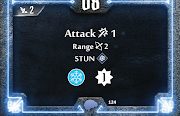
Stun
The most direct and powerful form of crowd control. The stunned monster skips it's next turn and completely disables it from doing anything. They cannot perform any actions on their next activation. You want to stun powerful monsters or ones that have problematic abilities (such as cultists or oozes who can summon more monsters).
Note stunned players must still play two cards on their turn or long rest.
| Pow! |
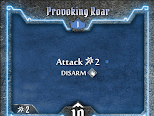
Disarm
The next best thing to a stun is a disarm. Disarm prevents enemies from making any Attack actions. While this is obviously great, this doesn't stop monsters from doing other actions such as moving, healing, summoning more monsters or applying status effects that aren't part of the attack action (i.e Curse adjacent enemies). Target the most dangerous enemies with your disarm effects.
| Icon of sweaty hands |
Immobilize
Immobilize prevents enemies from making any Move actions. The main power of immobilize is when you immobilize melee enemies from a distance, preventing them from closing the distance and making attacks on your party.
Immobilize can also be used on ranged enemies while you're standing next to them. This forces them to attack you at disadvantage, which essentially acts as a muddle effect.
| I took an arrow... to the foot |
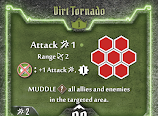
Muddle
Muddle is what is called a 'Soft' Crowd Control effect. Muddle doesn't stop the enemy from doing any particular action, but it reduces the effectiveness of their Attack action by giving them disadvantage. Muddle becomes more effective when combined with curse effects.
Note, ranged enemies who are muddled will stop trying to move to avoid disadvantage. This can be beneficial if you want to keep them in melee range.
| Muggle? Muddle? |
Push
Push can create distance between yourself and a melee enemy. Particularly useful against enemies with low movement. Pushing enemies onto traps can also hinder them if the trap comes with an effect such as stun.
Pull
Pull is generally less useful than Push, but still can be used to disable enemies by dragging them over traps. The other way to use Pull is to drag enemies closer to the rest of your party so they can lay on the damage or disable them another way.
Forced Movement / Forced Attack
Some classes have the power to make monsters move. This isn't tied to Push or Pull restrictions, but rather they grant you the freedom to force enemies to move and/or attack the way you want them to. You can leverage this by making enemies move over traps or having an enemy with a natural crowd control effect (e.g Monsters might have a Muddle effect tied to their Attack), attack each other.
Curse
Curse is another form of 'Soft' Crowd control and starts to become more powerful the more enemies you can curse. Curse reduces the effectiveness of monster attacks by adding more 'Null' cards into the deck, which increases their chances of doing no damage. If you can somehow manage to stack a monster deck with 10 curses (the maximum), the monsters will on average, miss over 1/3rd of their Attacks!
Note monsters don't receive a curse if you kill them with the Attack. They only get the curse from Attacks if they survive. This makes weak, multi target, softening attacks the best candidates for enhancing with curse effects.
| Zaaaap!... and now you will die alone. |
Obstacles and invisibility
Obstacles and invisible players can also be positioned to slow or redirect the path of enemies. This is discussed in the Cragheart guide here. Invisible players can also sit in doorways to prevent certain enemies from moving at all. Remember, if a monster cannot find a focus (e.g because a doorway is blocked by an invisible player and it has no path to attack any of the visible players) it doesn't move at all.
Initiative Dancing
"Initiative dancing" is where you go late to move in after a monster has acted, followed by going early to attack the monster and get out of it's range. There's an earlier blog post about this in more detail. It's not so much crowd control in itself, but it's another method to avoid taking damage.
Doorways
Doorways are an incredible positioning tool. You can use them to lure enemies in or stack your melee fighters infront to funnel enemies. Invisible characters can plop themselves in doorways to act as obstacles.
Position switching
Without getting deep into spoilers, there are rare abilities that allow you to switch positions of characters / monsters. This can be a useful trick for scenarios that don't require you to kill all enemies. If you have a player lagging behind the party, you can switch them with a monster and place them far away from where the action is, essentially removing them as a threat.
Mapping out your parties crowd control arsenal
If you're not playing solo, it's worth taking a quick mental check on what your teammates can and can't do. For example, if you're expecting your Spellweaver to be able to consistently disarm enemies - you are setting yourself up for disappointment.
 |
| Got it... 'do not expect the Scoundrel to crowd control'... |
A quick glance at all the starting characters level 1 cards and you can see what options each class has. But if you are too lazy to do it yourself, I have quickly noted down what each of the starter classes are capable of:
- Brute: Push, Disarm, Stun (loss).
- Spellweaver: Immobilize
- Tinkerer: Stun, Pull, AOE (area of effect) Immobilize (loss)
- Cragheart: Immobilize, AOE Muddle, Obstacle creation, AOE Disarm (loss)
- Scoundrel: Pull, Forced Movement
- Mindthief: Push, Stun, Muddle, Forced Movement
Jaws of the Lion
- Red Guard: Immobilize, Pull, Muddle, Disarm
- Hatchet: Muddle, Push, Immobilize (Loss)
- Demolitionist: Push, Muddle, Stun
- Voidwarden: Muddle, Curse, Disarm, Forced Movement, Stun (Loss)
Now for some specific tips and diagrams
Dead is the best crowd control
Dead is the best and most permanent form of crowd control. If there are low health enemies, try to finish them off before they can act again. A Bandit Guard on 1 health, does as much damage as a Bandit Guard on full health.
Don't double up
An easy mistake to make in Gloomhaven is doubling up on crowd control. This happens if your team doens't communicate intent, or communicates way too much that noone can discern the important information.
Say we're facing off against 3 Golems. The Tinkerer is playing Net Shooter, which will Immobilize them all. The Brute has played Provoking Roar to disarm one, the Mindthief is going to Stun another and the Cragheart is planning to muddle them.
 |
| Alright that's a LOT of status effects |
Doubling up on all these status effects is wasteful. The stun and the muddle aren't needed and with some careful positioning, we can simply just do with just the immobilize and the disarm if the Golem's are going for Melee attacks (which they usually do).
The stun from the Mindthief and muddle from Cragheart can be saved for future rounds. The Mindthief can move one space over to avoid taking a melee hit.
 |
| Slide over little vermling, don't get pummeled into dust |
Crowd control effects are a valuable resource, so make sure to stagger them to make the most of it rather than stacking them together.
The Gloomhaven Doorway Surround
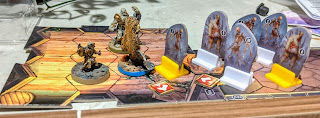
Lets say you are the unfortunate victim who opens this door. Yikes. What are some good ways to approach this fight?
 |
| Why is every door in Gloomhaven always full of nasty surprises? |
Well since your party is filled with flexible melee / ranged fighters, you can surround the door and limit how many the Living Bones can fight you.
To perform this trick tactical maneuver, everyone needs to move up in front of the door. Yes, even the Hatchet.
 |
| Go Bones! you can fight all 3! |
The theory is simple, you have 3 characters, fighting 1 skeleton at the same time. If my math's is any good, 3 is better than 1 and so you have a pretty distinct advantage here.
But the real cherry on top is preventing the other Living bones from doing anything at all. Because the first Living Bones has taken up the door hex, and your characters are blocking all the hexes out from there, the other 3 living bones have no possible moves to attack any of your characters. If a monster cannot position itself to attack any of your characters, even with infinite movement, it has no focus. No focus means they stay put. Even better is if you disarm / stun the Living bones at the front, you won't even take hits!
For flying melee enemies, this trick is still useful as it will force them to fly over to engage. If the flyers don't have enough movement, they'll sit behind the door waiting.
For rooms full of ranged enemies this trick isn't as useful and you're better off with a different approach
Solo surround
Is your team full of slow classes? Do you find you end up opening the doors yourself and waiting for your friends to catch up? What happens when the enemy count in a room is too high? How do you keep yourself alive while you wait for them to catch up?
You can park yourself inside a nook, either one you create yourself or one naturally found on the map. Here's an example.
The Tinkerer here has gone ahead of his teammates. The Cragheart and the Hatchet, both classes are not really known for their mobility.
 |
| So uh guys, how many turns till you get here? |
One thing you can do to preserve yourself is a Solo surround. It's exactly what it sounds like, surround yourself with stuff to minimize enemies focusing on you. If your class can create traps, a single obstacle near a corner will let you do a partial surround and two obstacles and a corner will let you fully surround yourself.
The Quatryl Tinkerer moves into the corner and plants a trap. A single Living Bones will move up and attack. But what happens to the rest? A quick reminder of the rules
 |
| Hey guys, this is my nook! |
Monsters without the Flying trait consider negative hexes (traps or hazardous terrain) to be obstacles when determining focus and movement unless movement through one of these hexes is the only way they can focus on a target.
So the rest of these Living Bones aren't going to focus on the Tinkerer. The trap is considered an obstacle, and they have other valid targets to focus on (the Cragheart and Hatchet) who they can reach without stepping on any traps. This setup allows the Tinkerer to survive the room by only allowing one enemy to attack him. Even better is if the Tinkerer can stun or disarm the single Living Bones in the corner!
This is great for sending enemies towards your slow teammates.
Retreating kill tunnel
So what if you enter a room, and it's full of ranged enemies? Well let me tell you about the retreating kill tunnel or retreating kill zone.
 |
| Oh damn, I don't want to be a pincushion! |
The premise is simple, you opened the door and you don't like what you see. A room with ranged enemies that will turn you into a hedgehog. Take a few steps back and get behind the wall.
Next, the archers are forced to step into the doorway to take shots at you. This clumps them up and also allows reduces the angles which they can take shots at your team. See below.
 |
| Pincushion! |
Even better is if you stun the enemy that you've lured into the doorway. This can block future movement and funnel the enemies even further.
Got any other useful crowd control maneuvers? Share them, let me know! Gloomhaven is a deep tactical game and even after many many scenarios, it's still a game where we are learning new tricks!
Thanks for the guide ! Openning doors is awful when you discover what is inside only when you open.
ReplyDeleteBut i have a question. On the last schematic are you sure that the top archer has no LOS on the cragheart ? North East archer's corner with North West CH's corner. Thanks