Jaws of the Lion Scenario 4, 5 campaign report
Welcome to another Gloomtactics special where we continue our Jaws of the Lion campaign run. We're about to embark into Scenario 4 and 5, the last few "teaching" scenarios.

Once again spoilers for Jaws of the Lion Scenario 4 and 5 ahead, so continue at your own peril.
Scenario 4 - A Ritual in stone
We continue the Scenario with our Demo / Voidwarden duo. In this scenario our objective is to kill all enemies, and in addition also destroy the 4 columns, marked by the yellow hexes and blue exclamations (one of them is hidden behind a zealot).
This is also the first scenario where we use our full set of level 1 cards and use battle goals, making this scenario practically what a normal run of a Gloomhaven dungeon is.
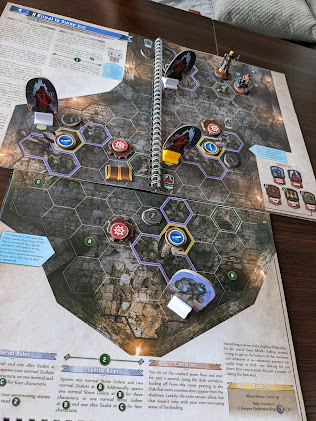
One very important special rule is that each objective has 3 hit points but can only be damaged by melee attacks. This means that as the Demolitionist, it will primarily be my job to destroy the objective markers. Taking a look at the game state, it looks like we should be able to clear out the Zealots one at a time before making our way to the golem towards the bottom. That's exactly what we do. But once we've cleared up the columns, surprise! More monsters are spawned which throws a wrench into our plans. Not only that, they spawn close to the golem which means our straightforward process of systematically isolating and killing them one at a time is no longer possible.

We push back the golem and dispatch of the zealots but after blowing up the last column more monsters are spawned, yikes!

It's getting dicey. I manage to throw a stun on the adjacent golem and this buys us a turn to focus our attention on the Zealots. At this point I also realize as the demolitionist I have very few cards left as I had to burn some earlier to avoid taking critical damage. With the looming mortality of the demolitionist hanging overhead, it also dawns on us how fragile our party composition is. Most of the Voidwarden's attacks are performed by getting the demolitionist or monsters to attack enemies, which means if I exhaust as the demolitionist - the Voidwarden will struggle to finish the enemies off on her own.

At this point we're down to a small number of cards. So we decide to blow Grasp of Doom and crowd control the stronger golem (as well as making it easier to kill later) while we focus down the Zealots.

We do manage to close out the scenario, but only barely. Our party is challenging because the Voidwarden has few direct attacks of her own and most of her power comes from using the Demolitionist as a puppet. On the last turn before I exhaust we manage to kill the golem. The poison helps us crack through it's shield value and finish it off. I ended the Scenario with 2 hitpoints remaining on the demolitionist and no more cards available to play with my entire hand in the lost pile.

Scenario 5 - A Deeper Understanding
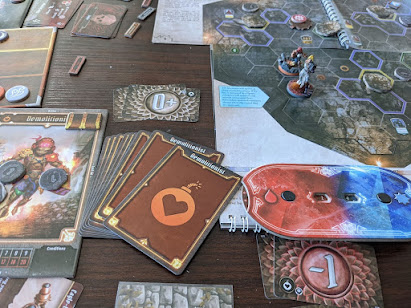
As we roll into Scenario 5, I made some changes to the setup. First I used dice to count the life totals and life remaining of the enemies. This makes it easier to visually see how much damage remaining a given target has. I also use replaced the damage markers on traps with dice as well.


I found this makes the game less fiddly with the wound markers and speeds up the monster health tracking.
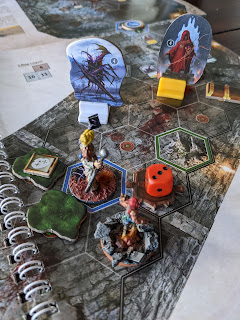
Starting off the Scenario, the Demon charges us. In response, my Voidwarden partner gently guides it ontop of the poison trap (and also right next to the wall), which allows for the demolitionist to use the power of Crushing Weight (my new favorite Demolitionist card) to obliterate the first Demon.

We continue through the room and we make a mistake with the ordering of our cards. We end up having the Voidwarden kick open the door because we miscoordinated our initiative, this kind results in a bit of a jam.
Fortunately my Voidwarden partner knows how to play the game, and we navigate out of this by forcing enemies to move ontop of traps and out of the doorway.
The traps soften up the monsters and we clean them up handily. Moving torwards the final door I get ready to set up an explosive blitz.
 |
 |
| OPEN UP! |
BoooOOoooOOOOM. Door open! Zealots stunned!

This Boss does have some special rules that are initially terrifying. Any damage received by any character (other than the tumor) heals the tumor. This includes damage dealt to Zealots and dealt to your party. Fortunately there's an easy way out, just knock out the support. Slamming this effect on the tumor prevents it from healing, which makes it's special rule practically useless. Infact this card is so good for killing this boss I even short rest earlier just to pick up the card and use it repeatedly.

Unable to heal, the tumor is knocked out in quick fashion. At the end of Scenario 5, the game nicely sets us up with enough experience to level up. It doesn't take a genius to see that a reusable stun (as well as a flexible Move 4 on the bottom) is an amazing card. We welcome Robotic enhancement to our pool of cards and replace Rubble which turns out is situational and awkward to use, similar to Windup.

We'll continue our campaign to save Gloomhaven next time. At first I found the Voidwarden / Demolitionist combo very awkward but now I'm kind of enjoying the challenge.
Comments
Post a Comment