Not sure if you want to play a tank, a healer, a crowd controller or a damage dealer? Well why not play them all?! The Cragheart does it all.
This Cragheart guide will show you how to do some amazing things with obstacle placement and destruction. Nothing like slowing down your enemies by throwing some rocks in their way.
Plus the Savvas Cragheart has a cool backstory. Exiled and had his chest cavity shattered by his people for being inadequate, he goes around slamming rocks at monsters. Damn, talk about a rocky upbringing!
 |
| Cragheart problem solving: Make rock, throw rock, destroy rock. |
Strengths
- The Cragheart has the highest tier of health, tied with Brute.
- Cragheart's ability to create and destroy obstacles allows for unique opportunities to funnel enemies or open up paths that would otherwise slow your team down.
- Flexible damage dealer, can bash enemies in melee or throw rocks at a distance.
- 11 Card starting hand!
- One of the very few classes with access to direct damage - ie damage that does not use attack modifiers and bypasses shield and retaliation effects.
Weaknesses
- Cragheart's highest damage abilities are conditional, they either require you to push people into obstacles or require Earth element to consume.
- Cragheart is slow, both in relation to initiative and movement. Cragheart can sometimes fall behind faster party members.
- Many of Cragheart's cards have friendly fire if you're not careful... ouch.
- Obstacle creation if used incorrectly will block your teammates and make them hate you.
Starting Items
The first item you want is the Boots of Striding to compensate for your movement. You can spend the remaining 10 gold on either a stamina or health potion. This will set you up for success.
 |
| Boots of moving faster |
Later on you'll want to look out for items that can help generate Earth Element for you. You also want to be on the lookout for anything that can make you tougher with more shields and items that make you move faster.
Cragheart flexibility
The Cragheart is flexible enough to alternate between melee or range combat and can build for either or both. Rather than prescribe a specific build like the
Scoundrel guide, I'll cover his core cards and ways to use them.
Massive Boulder
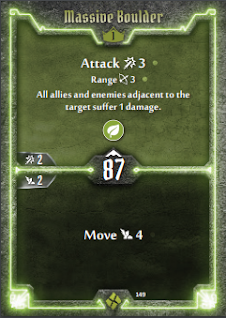 |
Massive Boulder Card
|
If any card is meant to make you feel like Toph the best Earth Bender, then this is it. Throw rocks at monsters. Not only is this card a solid Attack 3, at Range 3 (which is already good by level 1 standards), it generates a much needed Earth Element. To top it off, the boulder also shatters and damages nearby enemies (and friends) for 1 damage. This 1 damage isn't an attack so it ignores shields and doesn't trigger effects such as retaliate.
 |
| Admit it, you're playing Cragheart because you wish you were as cool as Toph. |
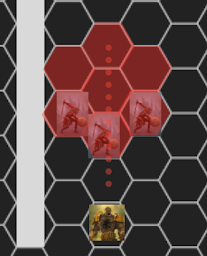
Dirt Tornado
Say you're stuck in a room full of mean bad guys who want to hurt you. You want to protect yourself and your team. What does a Cragheart do? Easy: Throw a Tornado at them.
Yep. Throw. A. Tornado.
Besides doing an Attack 1 to all enemies you hit (+1 if you consume Earth), it also muddles them. Friend inside the blast zone don't take the attack, but they receive the muddle effect too. Just to emphasize how good muddle is, let's do a little math.
Muddle gives everyone disadvantage, and disadvantage, on average, reduces damage output by approximately -0.77 per attack. Some quick maths: If you have 3 bandits, each doing Attack 2 - normally your party will expect to receive 6 damage total. If they are muddled, the average damage you'd expect to receive becomes closer to 3.7. The effect of disadvantage also increases the odds of a monster drawing a null in a freshly shuffled modifier deck from 5% to nearly 10% and makes it impossible for muddled enemies to naturally flip a 2X critical modifier.
Now don't be fooled by the Range 2 printed on the card. Range 2 means only 1 of the red hexes needs to be in Range 2 - this means your tornado can hit someone as far as 4 hexes away from you with this card.
 |
| Hiiiiiyaaaa: The sound of a tornado being thrown |
Lastly, if you can manage to get together 150 gold, enhancing Dirt Tornado with a curse effect will turn your Cragheart into one of the most powerful support characters in the game. For more details on enhancements, see the
enhancement guide.
Backup Ammunition
The top of this card often has new players scratching their head. Add Target? Yep. This means if you Throw a
Massive Boulder, you get to pick another target in Range, and throw another massive boulder. It essentially doubles your ranged firepower for the next 4 Attacks. It's a loss card, and for good reason.
For cards with area effects like Dirt Tornado, add target simply adds 1 extra target in range. Copied from the Gloomhaven FAQ
Q: How does Add Target interact with area attacks?
Add Target always adds a single extra target within the range of your attack to the attack, and this target cannot be an enemy already targeted by the attack (a single attack ability cannot target the same enemy multiple times). So if you got an Add Target effect on an area attack, you could pick one enemy within range but outside of the area (because all enemies in the area are already getting attacked) to get hit by the attack as well. All conditions and other effects of the attack (other than effects that would add additional attack targets) would apply to the added target, as well. Each instance of the Add Target effect adds an additional target to the attack using the above guidelines. Add Target DOES NOT add a hex to the area so effects that apply to the "Area" don't apply to the Add Target.
Note that if an attack ability targets everything within a specified range, Add Target would do nothing since you are already targeting everything in that range.
There's a couple more cards worth mentioning
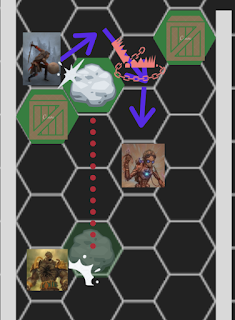
Heaving Swing
Now the top mechanic is a part of Cragheart's unique obstacle destruction. You push your victim into a rock, table or a sarcophagus and that obstacle explodes. While flying enemies normally ignore obstacles when moving, if you hit them with this ability they still feel the extra pain when pushed into the obstacle.
There are certain scenarios where obstacles are placed in a way to really slow your team down. Now here's a small snippet from the Scenario book, but I'm not going to tell you where it's from to avoid spoiling those who haven't played it yet. In these types of Scenario's a Cragheart's obstacle destruction is extremely helpful for the party.
 |
| Can't go around it, can't go over it, can't go under it, we have to go through it! |
Some cheeky bastard in your party is probably thinking - if there's certain obstacles that need to be destroyed to win a Scenario, couldn't you just Heaving Swing someone into it and win immediately?
Well no, the rulebook stamped that out. Pg 34
Obstacles with hit points can only be destroyed through damage and not through other character abilities. These obstacles are considered enemies for all ability purposes and have an initiative of 99 for the purpose of summon focusing, but they are immune to all negative conditions.
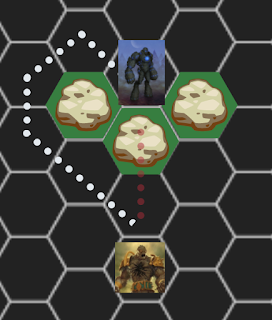
Avalanche
 |
Create miniature avalanches to fill up hexes with rocks.
|
Admittedly this card is not that impressive, but it is more to highlight the Cragheart's obstacle creation abilities. Later on the Cragheart does gets better obstacle creation cards. There are plenty of uses for creating obstacles, but the main one is forcing melee enemies to take a different / longer path, which can buy you time to perform a long rest or for your teammates to come to your aid. This diagram was covered in the
resting guide.
 |
| Bandit goes from 3 hexes of movement to Melee the Cragheart, to 5 hexes. |
Just before someone gets all excited about blocking doorways or cutting off sections of the map. Pg 14 of the rulebook clarifies this
It is possible for certain character abilities to create or move obstacles. When doing so, players can never completely cut off one area of the scenario map from another, such that the area cannot be moved into without going through the obstacles.
Party tricks and Earth Element
Cragheart is actually a great class for a beginner. Because Cragheart is slow, his party is most likely to act before him each round. This means you can kindly ask if your Brute, Spellweaver or Tinkerer is going to act before you and generate that Earth Element. If so, you can be confident you'll be alot slower than them so the Earth Element will be there for you to use.
Before the Scenario, it's also a good idea to ask your friends to pack the Earth element generating cards. Eye for an Eye for the Brute, Impaling Eruption for Spellweaver and Toxic Bolt for Tinkerer. As you unlock other classes, keep an eye out for classes than can create Earth Elements for you and kindly ask them to do the same.
Also make sure you tell the Spellweaver not to accidentally consume your Earth Element. You need it more than she does! It's just as bad as going into an office fridge and eating someone else's lunch. Rude!
A sample starting hand. This isn't prescribed, and you can adjust this to your party size. More focus on ranged attacks if your party is already melee heavy, and vice versa.
- Massive Boulder
- Dirt Tornado
- Crater (Top is good Ranged Attack, Bottom for when you need to jump)
- Backup Ammunition (2 Massive Boulders? Yes!)
- Rumbling Advance (Top & Bottom both Earth element creators)
- Heaving Swing (Boom!)
- Earthen Clod (Immobilizing enemies on ranged attacks are great for stopping melee enemies)
- Crushing Grasp (Decent Melee attack, but the real reason we want this is it creates Earth element)
- Rock Tunnel (Bottom is a loss but it's your biggest movement card to make the distance)
- Avalanche
- Opposing Strike (Melee pattern can be tricky to setup, but it's still an OK attack even if you hit 1 target)
From here on up I'll cover some key cards when leveling up. If you don't want any level up spoilers, please stop reading here.
.
.
.
Notable Cards to look out for when leveling up.
Level 3 - Clear the Way
There's a lot of text on the top, so let me break it down for you. The Cragheart gets a nearby rock / obstacle, and kicks it Range 4. Wherever that rock lands, everyone nearby gets hit.
 |
Rare footage of a Cragheart in training
|
This card has so many uses. It can be used to divide monsters, protect allies and more. If you have a Tinkerer or someone else who can make traps, then this can be used to force enemies into them, like so.
 |
| EarthBending it like Beckham. |
Level 4 - Rock Slide
This one kicks it up a notch. Three whole obstacles! Note, you can't actually block doorways with this as it's against the rules but there's other cool stuff you can do. You can create a wall to make enemies take a longer route around, or throw the obstacles behind your enemies to set yourself up for a Heaving Swing next turn.
 |
| This Terminator Golem was going to Move 2 spaces up and murder you, but now it needs to take the scenic route and Move 5 spaces to get to you. |
Level 7 - Meteor and Brutal Momentum
Both of these cards have unique and notable effects. Meteor has a really solid Move 4, Jump on the bottom - but on the Top, it allows us to fill the scenario up with one huge obstacle and trap the enemies it lands near.
Brutal Momentum rewards good obstacle placement. It looks like a humble Attack 3, but if you can corner them against your obstacles or a wall, then you can do up to 4 extra damage - and this extra damage is pure damage. Pure damage that ignores shields.
Level 8 - Rocky End
The top is a very powerful attack, but a difficult one to use properly. The bottom is what's interesting. Those random obstacles you've been throwing around? Well this is why! It's one of your biggest movement cards, but with a catch. You need to finish next to an obstacle! Your team's scoundrel might even stop laughing at you for being so slow!
I'll leave you to discover the rest of the Cragheart's cards on your own. Obstacle creation and destruction is something that is core to the Cragheart experience. Embrace it, don't shy away from it. Try not to hurt your party too much and remember to have fun!


Really like these guides. I hope you post the final two characters soon!
ReplyDeleteDefinitely my favourite starting class. It's so versatile!
ReplyDeleteOne thing to note is that card choice really depends on whether you play 2p or 3/4p. For example, Dirt Tornado and Backup Ammunition are core cards at 3/4p,but they aren't half as good in 2p because of the reduced number of enemies.
Looking forward to reading your Mindthief guide!