Gloomhaven tactics - Divide and Conquer strategy
Each room in Gloomhaven is filled with incredibly dangerous enemies and traps. With a little bit of strategy, Gloomhaven can be a little safer. Split those enemies up and make adventuring in Gloomhaven less dangerous!
Divide and Conquer (also sometimes known as Defeat in Detail), is a strategy to split up your enemies and fight them in smaller groups. We can use this in Gloomhaven to great effect to help win more scenarios.
Lets dive into the first room from Scenario 1. In a 4 player Scenario, there's 6 Bandit Guards deployed right in front of your party! That's a tough wall for a bunch of level 1 mercenaries.

Deployment
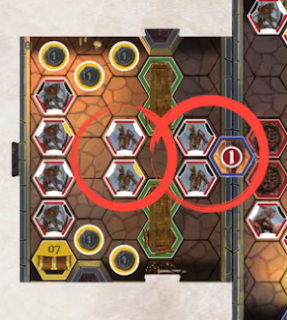
An inexperienced team might set up in the center and fight all 6 bandits at once. An experienced Gloomhaven mercenary would notice how the Bandit Guards have nicely split themselves into two groups and look to exploit it.


Why make the Bones fight your party outside?
 Going straight down the middle is going to be a difficult endeavor, especially if you have decided to play on Hard difficulty. There are obstacles in the center slowing your movementm, making it difficult to close on the Archers.

To take advantage of this, deploy your team to focus on one side. Instead of 6 Bandit Guards fighting you at once, you're fighting 3.
In this example the Tinkerer uses Net Shooter to immobilize the Bandit Guards on the left, while the rest of the team move to the right and try to eliminate the Bandits quickly. This approach reduces the number of hits your party takes as your fighting a smaller group of enemies at once.


Spoiler warning
...Before I continue, I am going take examples from the other rooms in Scenario 1 and parts of Scenario 3. If you don't want spoilers, stop reading now. If you already completed them or don't care, read on.
.
.
..
.
Take them out of the room
Another example where you can exploit the enemy positions to divide and conquer is in the third room in Scenario 1. This room is deadly. If you charge into the room you are faced fighting 4 Living bones with 4 Bandit Archers raining arrows onto your party. It's gonna hurt.

Visually the monsters in the room are split into groups. You have the Archers in the back and two groups of Living Bones with a small gap and some obstacles separating them. This small gap will funnel their movement preventing them from collapsing onto your party quickly, provided you don't charge right into the room.
You can split the living bones by sitting outside the room with ranged attacks and forcefully pull them out of position with the Tinker's Hook Gun for example.
 |
| Get over here! |
The Tinkerer can open the door, move backwards and drag one of the Living bones out. The party can dispatch the Bones quickly while being out of range and Line of Sight from the Archers.
 |
| Get out of there! |
- The obstacles and the doorway funnel and prevent the Living Bones from grouping up. It funnels them so only a limited number of enemies will fight your party at the same time.
- The Archers wont be able to shoot you, they need to spend a turn or two moving closer to do so.
- As the Archers move closer, they will be easier to engage for your melee party members.
Collapse the flank
Another example where Dividing and Conquering is crucial to success is Scenario 3. Visually you can see 3 groups of enemies, two immediate groups of guards in front and a group of ranged enemies further back.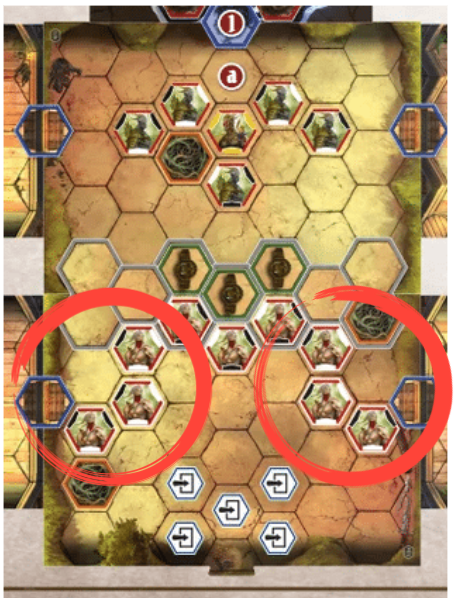
Instead, a strategy we can use is to collapse on one of the flanks and push into one of the side rooms. If you have a Tinkerer you can immobilize the other flank to keep them further away.
 |
| Get in the room! |
Why enter the side room (and possibly reveal more enemies)?
- Once you're in the room you only need to deal with the enemies inside.
- The Guards on the left side of the Scenario cannot fight you until they spend a few turns closing the distance.
- The Archer's cannot shoot you until they reach the doorway.
Instead of taking the side rooms, another alternative is to move quickly and go straight for the Archer's, leaving the Guards on the other flank behind. This can be a bit riskier. If party doesn't eliminate the Archer's quickly enough, the guards on the other flank and the scenario reinforcements may catch up to overwhelm your party.

Keep a look out for opportunities to divide up your enemies, especially in larger rooms. Just because there are alot of monsters, doesn't mean you need to fight them all at once. Combine this with effective crowd control and the monsters will have a tough time breaking your party.
Until next time, lets hope your road berries are safe!
Comments
Post a Comment